GoPro Studio Review
Developed and distributed directly by GoPro this video editing software was built specifically to help you make videos that have the GoPro look and feel and it works. Using the “templates” mode makes it really easy to edit you GoPro footage into a GoPro style movie.
PROS:
- USER INTERFACE
- WORKS WITH OTHER CAMERAS TO
- TEMPLATES TO HELP LEARN EDITING TECHNIQUES
- IT’S FREE
CONS:
- CAN BE SLOW TO LOAD AND WORK WITH ON CERTAIN COMPUTERS
- NEED TO CONVERT CERTAIN CLIPS TO A “WORKABLE” FORMAT
BOTTOM LINE:
THIS IS A GREAT BEGINNER SOFTWARE AND A GOOD WAY TO PRODUCE QUALITY VIDEOS FROM YOUR GOPRO FOOTAGE. BUT THE MORE ADVANCED USERS MIGHT MISS SOME FEATURES FOUND IN OTHER GO PRO VIDEO EDITING SOFTWARE.
Worldwide now you can see people taking videos with their cell phone cameras as well as small handled video cameras with strange looking mounts.
They are everywhere riding bikes off cliffs, jumping out or airplanes on snowboards, or swimming with the sharks in the open ocean.
They all have one thing in common they are using a product called Go Pro and in is in the form of the apps that are on the cell phone the mini video recorders and on some of the most outrageous camera mount available.
Today we are not going to look at any of this amazing hardware or software. Instead, we are going to look at what to do after you come home from your adventures.
What do you do with video you have captured? Raw video needs more than just take it a show it. If you want a quality video that you will want to show to your friends and family or put up on the web, you’ll need to edit and add dialog, music and perhaps spice different segments together.
That’s what today’s article is about. We are going to look at the best way to use GoPro editing software. We will also look at one Video editing methodology, and what it all of this combined can do for you.
When you have finished this article, you have a better handle on the software and it various and then decide if it is what your need to get your GoPro videos in shape to market, show, or just enjoy in the privacy of your own home.
What do you need to do to get a quality video from camera to a finished product?
Process of what to do is just as important as the technology used to retrieve and edit, manipulate and create a completed video project.
For this you need to take leaf out of the pro’s book and prepare up front before you go outside you home and start shooting.
The first step is to plan out exactly what you are attempting to accomplish.
Most of The professional video and moviemakers today use storyboards. Thais doesn’t have to be extensive it could be anything from a work of art like as in the original Star Wars storyboard art to something that is done in magic marker on a white board or even the wall inside your garage.
Sequencing of video gives you smooth flow and coherent structure to your video that would have extraneous segways to distract or confuse your intended audience.
Scripting what happens in the storyboard give you a document that tells everyone What and Who is supposed to do When, Where and How.
This sound a little backwards from traditional movies where the script comes first. But, in reality if you see what your vision for your video looks like up front it is easier to write it up then to try to think up the details and put them on paper first.
You Next go out a shoot your Video
You can now go out and do whatever your fertile imagination has cooked and have a good time doing it and hopefully come back with the shots you wanted and have done something exciting in the process.
Next, you are going to want to retrieve and begin processing of your raw footage when you return.
Importation is the first step
Let’s assume for a moment that you are using a Hero4 camera and Windows as your processing platform. Many Mac lovers will berate us over the choice but…
Any way your PC should be up to snuff and fast enough to make the project go smoothly and not have to wait hours for the processing.
So here are your cues for what to make sure you have:
- Window 7 or 8.1 and up. “Do not use Windows 8.0″(you’ll thank us)
- Your CPU should be a Quad Core CPU (4 processors are better than 1)
- You need a video card that supports Open GL 1.2 and up. Don’t skimp on the card, as it will directly affect the quality of the finished product.
- 4 gigs of Ram is the minimum 8 is better and beyond is gravy for the goose.
- For a hard disk use, the biggest and fastest you can get for you C drive. 7200 RPM or better and the more gigs the better.
- If you want to go external, USB 3 and a SATA drive. 4 TB (Not that you have to get this big a drive.) are now easy to get and you’ll be surprised at how fast it fills up.
- Finally, you’ll need QuickTime version 7.6 or higher.
Import your video from your Hero4 following the simple directions and place it into a properly labeled directory (Cap letters with the word RAW is always nice.
Now make a backup copy onto a separate drive is possible. (Again, you’ll thank us later.)
Now you are going to begin your edit.
Editing
The next step may sound a bit mundane but there is a method behind the madness.
Watch the video with a pencil, stopwatch, and a notebook.
Refer to your storyboard as you watch the video.
Make the points where scenes end and begin.
Mark and record bloopers to be removed later.
Marks sequences that don’t match your storyboard.
Break your video at the break points and file them in separate folders.
GoPro Studio will let you resplice it all together later.
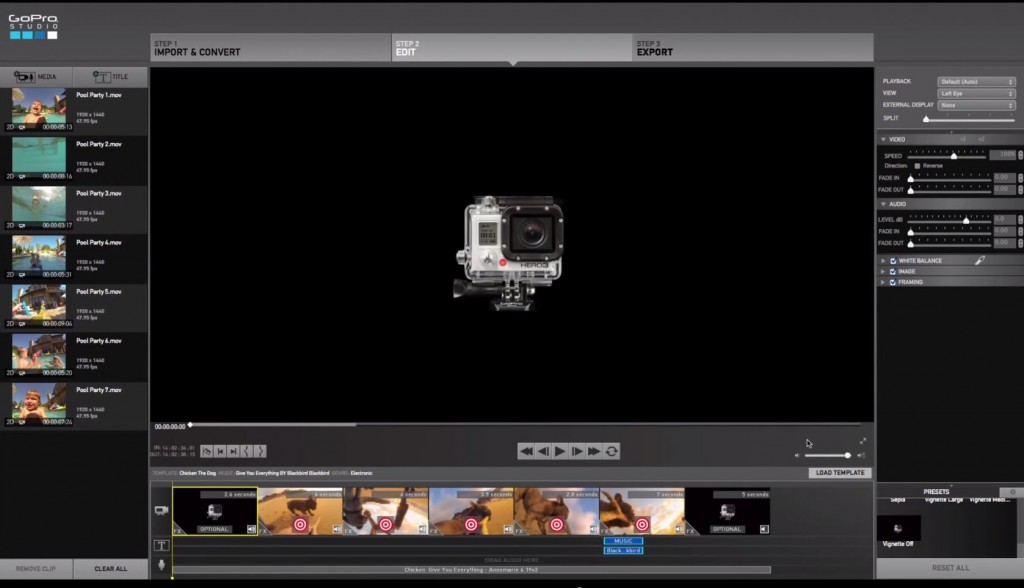
GoPro Studio Interface
Number the sequences following your storyboard.
For sequences that don’t match and you want to add them. Create a storyboard for the sequence, add it to your existing set, and update your script as well. (many skip this step to their later determent)
Now watch the video with the sequences as see how you like it.
If doesn’t flow the way you like you can alter the order and try various combinations until you have what you like.(Remember to update your Storyboard and script)
Now you have the video the way you like it.
Next, it’s time to add dialog (or use what was recorded).
Adding Dialog, Music, and effects.
Using the features of GoPro Studio, you now can add your special effect, titles, sound, and dialog.
Many like to use the templates that come with the package and replace them with the segments they recorded (now you see why we said to break your vid into multiple folders)
You can follow either approach for adding video effects.
The usual sequence is to add effects then add the audio portion.
Adding music for dramatic effect can make you video a winner.
If at any time, you suffer a setback (ie. Crash, accidental deletions etc.) You always have your master backed up offline to recover back to.
You even have a backup copy of the original RAW video in case of a total do over.
GoPro Studio is robust and your finished product will be something you’ll be proud of.
In case you have forgotten, you have these other features at you beck and call during the entire process:
- You have Project Autosave, However, make sure you do so manually as well and log it in your notebook.
- You can drag and drop by Alt+dragging and replace the template clips with your sequences.
- Use the GoPro Edit Templates they make your first videos look professional you can always change everything later as you gain experience.
- You have Trim, mix and color controls to adjust the colors and backgrounds.
- You will want to add titles, music, audio tracks and you have an extensive menu of feature for this and more.
- Special effects like Fish-eye is easy to have added.
- You can change and adjust the playback speed and get slow motion or speed up the action to compress time or pass over less exciting sequences.
- Capturing stills from the video is supported. This makes for great splash pages and video covers.
- Create a video from a series of photos.
- Create photo sequences from your videos.
- With The optional 3D HERO System, you can make your own 3D Vids as well.
You can now see the Power
If you use Process, Sequencing you get a higher quality video. If you add a Storyboard, Script, and notebook you are now working in the pro league and finally by using GoPro Studio you get a quality product that can be marketed, put up on the web, or just be enjoyed by you, your friends and family.
You can see how GoPro Studio is a great way to create and edit videos for you uses. If however you still can’t find what you need with this package there is a Professional version of GoPro Studied you can look at to see if it has the added features, you want and need. This will give a choice in the best Go Pro Video Editing Software out there on the web.
Today you seen a way that can help you get the most out of GoPro Studio. Use it as you will change it or use it as a springboard to create your own unique style of making the video you want and who knows you may be the next Spielberg or Lucas.